原型模式(Prototype Pattern): 通过给出一个原型对象来指明所有创建的对象的类型, 然后用复制这个原型对象的办法创建出更多同类型的对象.
设计模式-概述
当需要创建若干对象, 这些对象构造都极其复杂, 但是这些对象大部分属性是相同的. 此时使用原型模式能大大解决这种问题, 创建一个原型, 把相同的属性设置到其中, 其他的对象均是克隆自该原型, 然后根据使用的不同做少量的更改.
结构
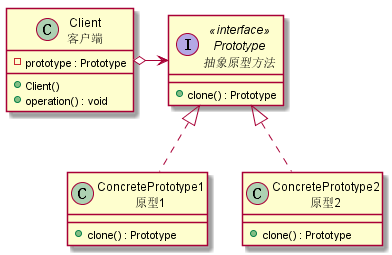
简单的原型模式
涉及到3个角色
- Clinet : 客户端
- Prototype : 抽象出原型功能
- ConcretePrototype : 具体的原型
1
2
3
4
5
6
7
8
9
10
11
12
13
14
15
16
17
18
19
20
21
22
23
24
25
26
| @startuml prototype-1
!include common.cuml
Class(Client,"客户端") {
- prototype : Prototype
+ Client()
+ operation() : void
}
Interface(Prototype,"抽象原型方法") <<interface>> {
+ clone() : Prototype
}
Class(ConcretePrototype1,"原型1") {
+ clone() : Prototype
}
Class(ConcretePrototype2,"原型2") {
+ clone() : Prototype
}
Client o--right--> Prototype
Prototype <|.. ConcretePrototype1
Prototype <|.. ConcretePrototype2
@enduml
|
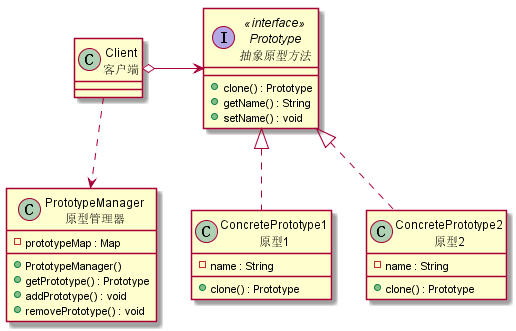
登记形式的原型模式
针对可能有大量的原型, 相比简单原型模式, 增加了一个PrototypeManager的角色, 通过它来获取原型.
1
2
3
4
5
6
7
8
9
10
11
12
13
14
15
16
17
18
19
20
21
22
23
24
25
26
27
28
29
30
31
32
33
34
35
36
37
| @startuml prototype-2
!include common.cuml
Class(PrototypeManager,"原型管理器") {
- prototypeMap : Map
+ PrototypeManager()
+ getPrototype() : Prototype
+ addPrototype() : void
+ removePrototype() : void
}
Class(Client,"客户端") {
}
Interface(Prototype,"抽象原型方法") <<interface>> {
+ clone() : Prototype
+ getName() : String
+ setName() : void
}
Class(ConcretePrototype1,"原型1") {
- name : String
+ clone() : Prototype
}
Class(ConcretePrototype2,"原型2") {
- name : String
+ clone() : Prototype
}
Client o--right--> Prototype
Client ..> PrototypeManager
Prototype <|.. ConcretePrototype1
Prototype <|.. ConcretePrototype2
@enduml
|
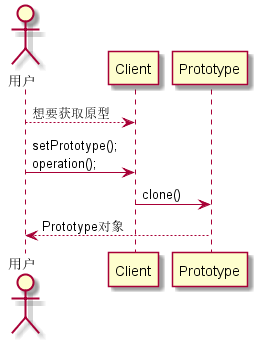
使用时序
简单式
1
2
3
4
5
6
7
8
9
10
11
12
13
14
| @startuml prototype-3
!include common.cuml
actor 用户 as U
participant Client as C
participant Prototype as P
U --> C : 想要获取原型
U -> C : setPrototype();\noperation();
C -> P : clone()
U <-- P : Prototype对象
@enduml
|
登记式

1
2
3
4
5
6
7
8
9
10
11
12
13
14
15
16
17
18
19
20
21
| @startuml prototype-4
!include common.cuml
actor 用户 as U
participant Client as C
participant PrototypeManager as PM
participant Prototype1 as P1
participant Prototype2 as P2
P1 -> PM : addPrototype()
P2 -> PM : addPrototype()
......
U --> C : 想要一个原型
C -> PM : getPrototype(prototypeName)
PM -> PM : foreach(prototypeMap)
PM --> C : Prototype对象
U <-- C : Prototype对象
@enduml
|
代码实现
登记式包含了简单式, 下面仅演示登记式
1
2
3
4
5
6
7
8
9
10
11
12
13
14
15
16
17
18
19
20
21
22
23
24
25
26
27
28
29
30
31
32
33
34
35
36
37
38
39
40
41
42
43
44
45
46
47
48
49
50
51
52
53
54
55
56
57
58
59
60
61
62
63
64
65
66
67
68
69
70
71
72
73
74
75
76
77
78
79
80
81
82
83
84
85
86
87
88
89
90
91
92
93
94
95
96
97
98
99
100
101
102
103
104
105
106
107
108
109
110
111
112
113
114
115
116
117
118
119
120
121
122
123
124
125
126
127
128
129
130
131
132
133
134
|
public class Client {
public static void main(String[] args) {
Prototype prototype1 = new ConcretePrototype1();
Prototype prototype2 = new ConcretePrototype2();
PrototypeManager.addPrototype("prototype1", prototype1);
PrototypeManager.addPrototype("prototype2", prototype2);
Prototype p1 = PrototypeManager.getPrototype("prototype1").clone();
p1.setName("张三");
Prototype p2 = PrototypeManager.getPrototype("prototype1").clone();
p2.setName("李四");
System.out.println(p1);
System.out.println(p2);
ConcretePrototype2 p3 = (ConcretePrototype2) PrototypeManager.getPrototype("prototype2").clone();
p3.setName("王二");
p3.setAge(12);
ConcretePrototype2 p4 = (ConcretePrototype2) PrototypeManager.getPrototype("prototype2").clone();
p4.setName("麻子");
p4.setAge(15);
System.out.println(p3);
System.out.println(p4);
}
}
interface Prototype {
Prototype clone();
void setName(String name);
String getName();
}
class ConcretePrototype1 implements Prototype {
private String name;
@Override
public Prototype clone() {
ConcretePrototype1 prototype = new ConcretePrototype1();
prototype.setName(this.name);
return prototype;
}
@Override
public void setName(String name) {
this.name = name;
}
@Override
public String getName() {
return name;
}
@Override
public String toString() {
return "ConcretePrototype1{" +
"name='" + name + '\'' +
'}';
}
}
class ConcretePrototype2 implements Prototype {
private String name;
private Integer age;
@Override
public Prototype clone() {
ConcretePrototype2 prototype = new ConcretePrototype2();
prototype.setName(this.name);
return prototype;
}
@Override
public void setName(String name) {
this.name = name;
}
@Override
public String getName() {
return name;
}
public Integer getAge() {
return age;
}
public void setAge(Integer age) {
this.age = age;
}
@Override
public String toString() {
return "ConcretePrototype2{" +
"name='" + name + '\'' +
", age=" + age +
'}';
}
}
class PrototypeManager {
private static Map<String, Prototype> map = new HashMap<>();
private PrototypeManager() {
}
public synchronized static void addPrototype(String id, Prototype prototype) {
map.put(id, prototype);
}
public synchronized static void removePrototype(String id) {
map.remove(id);
}
public synchronized static Prototype getPrototype(String id) {
Prototype prototype = map.get(id);
if (prototype == null) {
throw new RuntimeException("未找到原型");
}
return prototype;
}
}
|
关于拷贝的思考
原型模式是已某一个为模板来创建对象, 如果这个模板里面包含了引用类型, 使用浅拷贝会出现对个引用类型成员共同使用了同一个地址, 地址指向了同一个实例, 如果某个对象对其修改, 其他的对象也会读取到更改的内容, 所以针对引用类型的成员变量, 需要注意, 可以考虑使用序列化+反序列化来实现深拷贝.
使用场景
- 类初始化需要消化非常多的资源.
- 通过new产生一个对象需要非常繁琐的数据准备或访问权限时.
- 一个基础对象, 多个地方使用, 每个地方都可能会做修改.
具体应用
Spring 中 对bean加注解@Scope(value="prototype"), 可以标识这个bean是原型模式的(非单例).复杂 粘贴 功能.Struct2 中的 Action对象, 每个请求会对应一个复杂的Action, 所以使用了原型模式.