1 $ git clone git@github.com:alibaba/jetcache.git
Cache Cache接口定义和一些了的新增, 插入, 移除等操作方法, 除此之外还有tryLock方法的默认实现
1
2
3
4
5
6
7
8
9
10
11
12
13
14
15
16
17
18
19
20
21
22
23
24
25
26
27
28
29
30
31
32
33
34
35
36
37
38
39
40
41
42
43
44
45
46
47
48
49
50
51
52
53
54
55
56
57
58
59
60
61
62
63
64
default AutoReleaseLock tryLock (K key, long expire, TimeUnit timeUnit) { if (key == null ) { return null ; } final String uuid = UUID.randomUUID().toString(); final long expireTimestamp = System.currentTimeMillis() + timeUnit.toMillis(expire); final CacheConfig config = config(); AutoReleaseLock lock = () -> { int unlockCount = 0 ; while (unlockCount++ < config.getTryLockUnlockCount()) { if (System.currentTimeMillis() < expireTimestamp) { CacheResult unlockResult = REMOVE(key); if (unlockResult.getResultCode() == CacheResultCode.FAIL || unlockResult.getResultCode() == CacheResultCode.PART_SUCCESS) { } else if (unlockResult.isSuccess()) { return ; } else { return ; } } else { return ; } } }; int lockCount = 0 ; Cache cache = this ; while (lockCount++ < config.getTryLockLockCount()) { CacheResult lockResult = cache.PUT_IF_ABSENT(key, uuid, expire, timeUnit); if (lockResult.isSuccess()) { return lock; } else if (lockResult.getResultCode() == CacheResultCode.FAIL || lockResult.getResultCode() == CacheResultCode.PART_SUCCESS) { int inquiryCount = 0 ; while (inquiryCount++ < config.getTryLockInquiryCount()) { CacheGetResult inquiryResult = cache.GET(key); if (inquiryResult.isSuccess()) { if (uuid.equals(inquiryResult.getValue())) { return lock; } else { return null ; } } else { } } } else { return null ; } return null ; }
AbstractCache
使用了模板方法模式, 实现了Cache接口, 支持了各种事件发布的功能(CacheEvent的实现), 并且对外暴露abstract方法, 供不同Cache实现自己的新增, 插入, 移除等操作
实现了同步加载的静态方法synchronizedLoad, 目的是为了支持computeIfAbsent的逻辑, computeIfAbsent会在查找缓存不到的时候, 自动执行load, 但是会有缓存穿透的风险, 大量请求可能导致一些问题(load操作很耗资源的情况下)
1 2 3 4 5 6 7 8 9 10 11 12 13 14 15 16 17 18 19 20 21 22 23 24 25 26 27 28 29 30 31 32 33 34 35 36 37 38 39 40 41 42 43 44 45 46 47 48 49 50 51 52 53 54 55 56 57 58 59 60 61 62 63 64 65 66 67 68 69 70 71 72 73 74 75 76 77 78 79 80 81 82 83 84 85 86 87 88 89 90 91 92 93 94 95 96 97 98 99 100 101 102 103 104 105 106 107 108 109 110 111 112 113 static <K, V> V computeIfAbsentImpl (K key, Function<K, V> loader, boolean cacheNullWhenLoaderReturnNull, long expireAfterWrite, TimeUnit timeUnit, Cache<K, V> cache) { AbstractCache<K, V> abstractCache = CacheUtil.getAbstractCache(cache); CacheLoader<K, V> newLoader = CacheUtil.createProxyLoader(cache, loader, abstractCache::notify); CacheGetResult<V> r; if (cache instanceof RefreshCache) { RefreshCache<K, V> refreshCache = ((RefreshCache<K, V>) cache); r = refreshCache.GET(key); refreshCache.addOrUpdateRefreshTask(key, newLoader); } else { r = cache.GET(key); } if (r.isSuccess()) { return r.getValue(); } else { Consumer<V> cacheUpdater = (loadedValue) -> { if (needUpdate(loadedValue, cacheNullWhenLoaderReturnNull, newLoader)) { if (timeUnit != null ) { cache.PUT(key, loadedValue, expireAfterWrite, timeUnit).waitForResult(); } else { cache.PUT(key, loadedValue).waitForResult(); } } }; V loadedValue; if (cache.config().isCachePenetrationProtect()) { loadedValue = synchronizedLoad(cache.config(), abstractCache, key, newLoader, cacheUpdater); } else { loadedValue = newLoader.apply(key); cacheUpdater.accept(loadedValue); } return loadedValue; } } static <K, V> V synchronizedLoad (CacheConfig config, AbstractCache<K,V> abstractCache, K key, Function<K, V> newLoader, Consumer<V> cacheUpdater) { ConcurrentHashMap<Object, LoaderLock> loaderMap = abstractCache.initOrGetLoaderMap(); Object lockKey = buildLoaderLockKey(abstractCache, key); while (true ) { boolean create[] = new boolean [1 ]; LoaderLock ll = loaderMap.computeIfAbsent(lockKey, (unusedKey) -> { create[0 ] = true ; LoaderLock loaderLock = new LoaderLock (); loaderLock.signal = new CountDownLatch (1 ); loaderLock.loaderThread = Thread.currentThread(); return loaderLock; }); if (create[0 ] || ll.loaderThread == Thread.currentThread()) { try { V loadedValue = newLoader.apply(key); ll.success = true ; ll.value = loadedValue; cacheUpdater.accept(loadedValue); return loadedValue; } finally { if (create[0 ]) { ll.signal.countDown(); loaderMap.remove(lockKey); } } } else { try { Duration timeout = config.getPenetrationProtectTimeout(); if (timeout == null ) { ll.signal.await(); } else { boolean ok = ll.signal.await(timeout.toMillis(), TimeUnit.MILLISECONDS); if (!ok) { return newLoader.apply(key); } } } catch (InterruptedException e) { return newLoader.apply(key); } if (ll.success) { return (V) ll.value; } else { continue ; } } } }
AbstractEmbeddedCache
继承自AbstractCache, 加了个InnerMap的成员变量, InnerMap属于适配器模式, 用来屏蔽不同本地缓存的差异性(jetcache目前提供了LinkedHashMapCache和CaffeineCache,如果用的不爽可以自定义一个缓存集合,用InnerMap来适配一下增删改查等方法)
并且AbstractEmbeddedCache引入了CacheValueHolder, 是对缓存中value的包装, 其中包含了过期时间.
CaffeineCache
基于内存的缓存,使用Caffeine
需要引入:
1 2 3 4 5 <dependency > <groupId > com.github.ben-manes.caffeine</groupId > <artifactId > caffeine</artifactId > <version > 2.8.1</version > </dependency >
Caffeine在算法上对本地缓存做了优化, 缓存性能接近理论最优, 采用了一种结合LRU、LFU优点的算法:W-TinyLFU
TinyLfu 回收策略,提供了一个近乎最佳的命中率。当数据的访问模式不随时间变化的时候,LFU的策略能够带来最佳的缓存命中率。然而LFU有两个缺点:首先,它需要给每个记录项维护频率信息,每次访问都需要更新,这是个巨大的开销;其次,如果数据访问模式随时间有变,LFU的频率信息无法随之变化,因此早先频繁访问的记录可能会占据缓存,而后期访问较多的记录则无法被命中。因此,大多数的缓存设计都是基于LRU或者其变种来进行的。相比之下,LRU并不需要维护昂贵的缓存记录元信息,同时也能够反应随时间变化的数据访问模式。然而,在许多负载之下,LRU依然需要更多的空间才能做到跟,FU一致的缓存命中率。因此,一个“现代”的缓存,应当能够综合两者的长处。TinyLFU维护了近期访问记录的频率信息,作为一个过滤器,当新记录来时,只有满足TinyLFU要求的记录才可以被插入缓存。
LinkedHashMapCache
自制的简易内存缓存,没有任何依赖
使用LinkedHashMap实现了一个LRUMap, 缓存过期依赖于Cleaner
1
2
3
4
5
6
7
8
9
10
11
12
13
14
15
16
17
18
19
20
21
22
23
24
25
26
27
28
29
30
31
32
class Cleaner { static LinkedList<WeakReference<LinkedHashMapCache>> linkedHashMapCaches = new LinkedList <>(); static { ScheduledExecutorService executorService = JetCacheExecutor.defaultExecutor(); executorService.scheduleWithFixedDelay(() -> run(), 60 , 60 , TimeUnit.SECONDS); } static void add (LinkedHashMapCache cache) { synchronized (linkedHashMapCaches) { linkedHashMapCaches.add(new WeakReference <>(cache)); } } static void run () { synchronized (linkedHashMapCaches) { Iterator<WeakReference<LinkedHashMapCache>> it = linkedHashMapCaches.iterator(); while (it.hasNext()) { WeakReference<LinkedHashMapCache> ref = it.next(); LinkedHashMapCache c = ref.get(); if (c == null ) { it.remove(); } else { c.cleanExpiredEntry(); } } } } }
AbstractExternalCache 外部存储的抽象, 由于是外部的存储, 所以涉及到Value的序列化和反序列化
RedisCache
redis实现,使用jedis客户端
RedisCache可以做读写分离, 并且可以设置每个slave节点的权重, 相关代码如下:
1 2 3 4 5 6 7 8 9 10 11 12 13 14 15 16 17 18 19 20 21 22 23 24 25 26 27 28 29 30 31 32 33 34 35 36 37 38 39 40 41 42 43 44 45 46 47 48 49 50 51 52 53 54 55 56 57 58 59 60 61 62 63 64 65 66 67 68 69 70 71 72 73 74 75 76 77 78 79 80 81 82 public RedisCache (RedisCacheConfig<K, V> config) { super (config); this .config = config; this .valueEncoder = config.getValueEncoder(); this .valueDecoder = config.getValueDecoder(); if (config.getJedisPool() == null ) { throw new CacheConfigException ("no pool" ); } if (config.isReadFromSlave()) { if (config.getJedisSlavePools() == null || config.getJedisSlavePools().length == 0 ) { throw new CacheConfigException ("slaves not config" ); } if (config.getSlaveReadWeights() == null ) { initDefaultWeights(config); } else if (config.getSlaveReadWeights().length != config.getJedisSlavePools().length) { initDefaultWeights(config); } } if (config.isExpireAfterAccess()) { throw new CacheConfigException ("expireAfterAccess is not supported" ); } } private void initDefaultWeights (RedisCacheConfig<K, V> config) { int len = config.getJedisSlavePools().length; int [] weights = new int [len]; Arrays.fill(weights, 100 ); config.setSlaveReadWeights(weights); } Pool<Jedis> getReadPool () { if (!config.isReadFromSlave()) { return config.getJedisPool(); } int [] weights = config.getSlaveReadWeights(); int index = randomIndex(weights); return config.getJedisSlavePools()[index]; } static int randomIndex (int [] weights) { int sumOfWeights = 0 ; for (int w : weights) { sumOfWeights += w; } int r = random.nextInt(sumOfWeights); int x = 0 ; for (int i = 0 ; i < weights.length; i++) { x += weights[i]; if (r < x){ return i; } } throw new CacheException ("assert false" ); } protected CacheResult do_PUT_ALL (Map<? extends K, ? extends V> map, long expireAfterWrite, TimeUnit timeUnit) { try (Jedis jedis = config.getJedisPool().getResource()) { int failCount = 0 ; List<Response<String>> responses = new ArrayList <>(); Pipeline p = jedis.pipelined(); for (Map.Entry<? extends K , ? extends V > en : map.entrySet()) { CacheValueHolder<V> holder = new CacheValueHolder (en.getValue(), timeUnit.toMillis(expireAfterWrite)); Response<String> resp = p.psetex(buildKey(en.getKey()), timeUnit.toMillis(expireAfterWrite), valueEncoder.apply(holder)); responses.add(resp); } p.sync(); for (Response<String> resp : responses) { if (!"OK" .equals(resp.get())){ failCount++; } } return failCount == 0 ? CacheResult.SUCCESS_WITHOUT_MSG : failCount == map.size() ? CacheResult.FAIL_WITHOUT_MSG : CacheResult.PART_SUCCESS_WITHOUT_MSG; } catch (Exception ex) { return new CacheResult (ex); } }
RedisLettuceCache
redis实现,使用lettuce客户端
redis操作的lettuce客户端版本, 本文没啥好说的, 有时间写篇介绍lettuce.
Jedis是直连模式,在多个线程间共享一个Jedis实例时是线程不安全的,可以通过创建多个Jedis实例来解决,但当连接数量增多时,物理连接成本就较高同时会影响性能,因此较好的解决方法是使用JedisPool。
MultiLevelCache
多级缓存,注解方式配置只支持了两级,实际上这个类支持N级
内部有个Cache数组, 从这里可以知道其是对Cache的包装, 并支持多个Cache, 子Cache不允许配置load
1
2
3
4
5
6
7
8
9
10
11
12
13
14
15
16
public MultiLevelCache (MultiLevelCacheConfig<K, V> cacheConfig) throws CacheConfigException { this .config = cacheConfig; this .caches = cacheConfig.getCaches().toArray(new Cache []{}); checkCaches(); } private void checkCaches () { if (caches == null || caches.length == 0 ) { throw new IllegalArgumentException (); } for (Cache c : caches) { if (c.config().getLoader() != null ) { throw new CacheConfigException ("Loader on sub cache is not allowed, set the loader into MultiLevelCache." ); } } }
取数据时, 按照顺序从Cache数组中的各个元素中取, 如果上级没有命中, 下级命中了, 会有一个往上级同步的操作.
1
2
3
4
5
6
7
8
9
10
11
12
13
14
15
16
17
18
19
20
21
22
23
24
25
26
27
28
29
30
31
32
33
34
35
36
37
38
39
40
41
42
43
44
45
46
47
48
49
50
51
52
53
54
55
56
@Override protected CacheGetResult<V> do_GET (K key) { for (int i = 0 ; i < caches.length; i++) { Cache cache = caches[i]; CacheGetResult result = cache.GET(key); if (result.isSuccess()) { CacheValueHolder<V> holder = unwrapHolder(result.getHolder()); checkResultAndFillUpperCache(key, i, holder); return new CacheGetResult (CacheResultCode.SUCCESS, null , holder); } } return CacheGetResult.NOT_EXISTS_WITHOUT_MSG; } private void checkResultAndFillUpperCache (K key, int i, CacheValueHolder<V> h) { Objects.requireNonNull(h); long currentExpire = h.getExpireTime(); long now = System.currentTimeMillis(); if (now <= currentExpire) { if (config.isUseExpireOfSubCache()){ PUT_caches(i, key, h.getValue(), 0 , null ); } else { long restTtl = currentExpire - now; if (restTtl > 0 ) { PUT_caches(i, key, h.getValue(), restTtl, TimeUnit.MILLISECONDS); } } } } private CacheResult PUT_caches (int lastIndex, K key, V value, long expire, TimeUnit timeUnit) { CompletableFuture<ResultData> future = CompletableFuture.completedFuture(null ); for (int i = 0 ; i < lastIndex; i++) { Cache cache = caches[i]; CacheResult r; if (timeUnit == null ) { r = cache.PUT(key, value); } else { r = cache.PUT(key, value, expire, timeUnit); } future = combine(future, r); } return new CacheResult (future); } private CompletableFuture<ResultData> combine (CompletableFuture<ResultData> future, CacheResult result) { return future.thenCombine(result.future(), (d1, d2) -> { if (d1 == null ) { return d2; } if (d1.getResultCode() != d2.getResultCode()) { return new ResultData (CacheResultCode.PART_SUCCESS, null , null ); } return d1; }); }
CacheResultCode.PART_SUCCESS 在 MultiLevelCache 下会出现, 表示操作多级缓存时, 某一部分没有操作成功
MultiLevelCache的tryLock仅仅使用最后一级Cache的tryLock
1
2
3
4
5
6
public AutoReleaseLock tryLock (K key, long expire, TimeUnit timeUnit) { if (key == null ) { return null ; } return caches[caches.length - 1 ].tryLock(key, expire, timeUnit); }
MultiLevelCache不支持putIfAbsent和do_PUT_IF_ABSENT方法, 会报错.
1
2
3
4
5
6
7
8
@Override public boolean putIfAbsent (K key, V value) { throw new UnsupportedOperationException ("putIfAbsent is not supported by MultiLevelCache" ); } @Override protected CacheResult do_PUT_IF_ABSENT (K key, V value, long expireAfterWrite, TimeUnit timeUnit) { throw new UnsupportedOperationException ("PUT_IF_ABSENT is not supported by MultiLevelCache" ); }
ProxyCache ProxyCache接口继承了Cache接口, 作用是代理Cache实现一些牛批的功能, 例如下面
LoadingCache
基于Decorator模式,提供自动加载功能
主要是对get和getAll两个方法的处理, 如果配置了load, 这两方法将会在娶不到数据的时候自动load
1
2
3
4
5
6
7
8
9
10
11
12
13
14
15
16
17
18
19
20
21
22
23
24
25
26
27
28
29
30
31
32
33
34
35
36
37
38
39
40
41
42
43
44
45
46
47
48
49
50
51
52
53
54
55
56
57
58
59
60
61
62
63
64
65
66
67
68
69
70
71
72
73
74
@Override public V get (K key) throws CacheInvokeException { CacheLoader<K, V> loader = config.getLoader(); if (loader != null ) { return AbstractCache.computeIfAbsentImpl(key, loader, config.isCacheNullValue() ,0 , null , this ); } else { return cache.get(key); } } @Override public Map<K, V> getAll (Set<? extends K> keys) throws CacheInvokeException { CacheLoader<K, V> loader = config.getLoader(); if (loader != null ) { MultiGetResult<K, V> r = GET_ALL(keys); Map<K, V> kvMap; if (r.isSuccess() || r.getResultCode() == CacheResultCode.PART_SUCCESS) { kvMap = r.unwrapValues(); } else { kvMap = new HashMap <>(); } Set<K> keysNeedLoad = new LinkedHashSet <>(); keys.forEach((k) -> { if (!kvMap.containsKey(k)) { keysNeedLoad.add(k); } }); if (!config.isCachePenetrationProtect()) { if (eventConsumer != null ) { loader = CacheUtil.createProxyLoader(cache, loader, eventConsumer); } Map<K, V> loadResult; try { loadResult = loader.loadAll(keysNeedLoad); CacheLoader<K, V> theLoader = loader; Map<K, V> updateValues = loadResult.entrySet().stream() .filter(kvEntry -> needUpdate(kvEntry.getValue(), theLoader)) .collect(Collectors.toMap(Map.Entry::getKey, Map.Entry::getValue)); if (!updateValues.isEmpty()) { PUT_ALL(updateValues); } } catch (Throwable e) { throw new CacheInvokeException (e); } kvMap.putAll(loadResult); } else { AbstractCache<K, V> abstractCache = CacheUtil.getAbstractCache(cache); loader = CacheUtil.createProxyLoader(cache, loader, eventConsumer); for (K key : keysNeedLoad) { Consumer<V> cacheUpdater = (v) -> { if (needUpdate(v, config.getLoader())) { PUT(key, v); } }; V v = AbstractCache.synchronizedLoad(config, abstractCache, key, loader, cacheUpdater); kvMap.put(key, v); } } return kvMap; } else { return cache.getAll(keys); } }
RefreshCache
基于Decorator模式,提供自动刷新功能
继承自LoadingCache, 即他的get和getAll能够自动load, 除此之外, 他自己做了这些工作:
使用ConcurrentHashMap维护了一个刷新任务集合, 为了方便批量操作,例如停止刷新, 并且用boolean字段标识代理的Cache是不是一个MultiLevelCache(多级缓存和单级的处理逻辑不一样,下面关注下)
RefreshCache同样也是对get和getAll做了增强, 添加了addOrUpdateRefreshTask的操作.
1
2
3
4
5
6
7
8
9
10
11
12
13
14
15
16
17
@Override public V get (K key) throws CacheInvokeException { if (config.getRefreshPolicy() != null && hasLoader()) { addOrUpdateRefreshTask(key, null ); } return super .get(key); } @Override public Map<K, V> getAll (Set<? extends K> keys) throws CacheInvokeException { if (config.getRefreshPolicy() != null && hasLoader()) { for (K key : keys) { addOrUpdateRefreshTask(key, null ); } } return super .getAll(keys); }
addOrUpdateRefreshTask 主要做了针对一个缓存的key, 创建一个RefreshTask任务, RefreshTask继承了Runnable, 它是个可被执行的.
1
2
3
4
5
6
7
8
9
10
11
12
13
14
15
16
17
18
19
20
21
22
23
24
protected void addOrUpdateRefreshTask (K key, CacheLoader<K,V> loader) { RefreshPolicy refreshPolicy = config.getRefreshPolicy(); if (refreshPolicy == null ) { return ; } long refreshMillis = refreshPolicy.getRefreshMillis(); if (refreshMillis > 0 ) { Object taskId = getTaskId(key); RefreshTask refreshTask = taskMap.computeIfAbsent(taskId, tid -> { logger.debug("add refresh task. interval={}, key={}" , refreshMillis , key); RefreshTask task = new RefreshTask (taskId, key, loader); task.lastAccessTime = System.currentTimeMillis(); ScheduledFuture<?> future = JetCacheExecutor.heavyIOExecutor().scheduleWithFixedDelay( task, refreshMillis, refreshMillis, TimeUnit.MILLISECONDS); task.future = future; return task; }); refreshTask.lastAccessTime = System.currentTimeMillis(); } }
从上可知道, 一个支持刷新的缓存, 只有get或者getAll方法调用后才会去启动刷新任务, 这样做避免了无谓的资源浪费, 即一个可刷新缓存被put后, 一直没有被获取, 那么他不会自动刷新.
具体的刷新逻辑 RefreshTask的run方法
1
2
3
4
5
6
7
8
9
10
11
12
13
14
15
16
17
18
19
20
21
22
23
24
25
26
27
28
29
@Override public void run () { try { if (config.getRefreshPolicy() == null || (loader == null && !hasLoader())) { cancel(); return ; } long now = System.currentTimeMillis(); long stopRefreshAfterLastAccessMillis = config.getRefreshPolicy().getStopRefreshAfterLastAccessMillis(); if (stopRefreshAfterLastAccessMillis > 0 ) { if (lastAccessTime + stopRefreshAfterLastAccessMillis < now) { cancel(); return ; } } Cache concreteCache = concreteCache(); if (concreteCache instanceof AbstractExternalCache) { externalLoad(concreteCache, now); } else { load(); } } catch (Throwable e) { logger.error("refresh error: key=" + key, e); } }
1
2
3
4
5
6
7
8
9
10
11
12
13
14
15
16
17
18
19
20
21
22
23
24
25
26
27
28
29
30
31
32
33
34
35
36
37
38
39
40
41
42
43
44
45
46
47
48
49
50
51
52
53
54
55
56
57
58
59
60
61
62
private void externalLoad (final Cache concreteCache, final long currentTime) throws Throwable { byte [] newKey = ((AbstractExternalCache) concreteCache).buildKey(key); byte [] lockKey = combine(newKey, "_#RL#" .getBytes()); long loadTimeOut = RefreshCache.this .config.getRefreshPolicy().getRefreshLockTimeoutMillis(); long refreshMillis = config.getRefreshPolicy().getRefreshMillis(); byte [] timestampKey = combine(newKey, "_#TS#" .getBytes()); CacheGetResult refreshTimeResult = concreteCache.GET(timestampKey); boolean shouldLoad = false ; if (refreshTimeResult.isSuccess()) { shouldLoad = currentTime >= Long.parseLong(refreshTimeResult.getValue().toString()) + refreshMillis; } else if (refreshTimeResult.getResultCode() == CacheResultCode.NOT_EXISTS) { shouldLoad = true ; } if (!shouldLoad) { if (multiLevelCache) { refreshUpperCaches(key); } return ; } Runnable r = () -> { try { load(); concreteCache.put(timestampKey, String.valueOf(System.currentTimeMillis())); } catch (Throwable e) { throw new CacheException ("refresh error" , e); } }; boolean lockSuccess = concreteCache.tryLockAndRun(lockKey, loadTimeOut, TimeUnit.MILLISECONDS, r); if (!lockSuccess && multiLevelCache) { JetCacheExecutor.heavyIOExecutor().schedule( () -> refreshUpperCaches(key), (long )(0.2 * refreshMillis), TimeUnit.MILLISECONDS); } } private void load () throws Throwable { CacheLoader<K,V> l = loader == null ? config.getLoader(): loader; if (l != null ) { l = CacheUtil.createProxyLoader(cache, l, eventConsumer); V v = l.load(key); if (needUpdate(v, l)) { cache.PUT(key, v); } } }
CacheMonitor与CacheStat CacheMonitor主要的作用是监听CacheEvent, jetCache实现了一个默认的CacheMonitor—–DefaultCacheMonitor;
DefaultCacheMonitor 里面包含了CacheStat的成员变量, CacheStat用来描述jetCache管理的缓存属性信息
一个Cache对应一个DefaultCacheMonitor, 一个DefaultCacheMonitor对应一个CacheStat, 每有个CacheEvent的发布, 都会通知到CacheMonitor, 并更新CacheStat
1
2
3
4
5
6
7
8
9
10
11
12
13
14
15
16
17
18
19
20
21
22
23
24
25
26
27
28
29
30
31
32
33
34
35
36
37
38
39
public class CacheStat implements Serializable , Cloneable { private static final long serialVersionUID = -8802969946750554026L ; protected String cacheName; protected long statStartTime; protected long statEndTime; protected long getCount; protected long getHitCount; protected long getMissCount; protected long getFailCount; protected long getExpireCount; protected long getTimeSum; protected long minGetTime = Long.MAX_VALUE; protected long maxGetTime = 0 ; protected long putCount; protected long putSuccessCount; protected long putFailCount; protected long putTimeSum; protected long minPutTime = Long.MAX_VALUE; protected long maxPutTime = 0 ; protected long removeCount; protected long removeSuccessCount; protected long removeFailCount; protected long removeTimeSum; protected long minRemoveTime = Long.MAX_VALUE; protected long maxRemoveTime = 0 ; protected long loadCount; protected long loadSuccessCount; protected long loadFailCount; protected long loadTimeSum; protected long minLoadTime = Long.MAX_VALUE; protected long maxLoadTime = 0 ; }
CacheMonitorManager CacheMonitor的管理者, 使用者可以通过其添加自定义的Monitor, jetcache有个默认的实现DefaultCacheMonitorManager
对于多级缓存, DefaultCacheMonitorManager会新增两种Monitor
针对多级缓存, DefaultCacheMonitorManager仅仅对前两个缓存做了监控.
1
2
3
4
5
6
7
8
9
10
11
12
13
14
15
16
17
18
19
20
21
22
23
24
25
26
27
28
29
30
31
32
33
34
35
36
37
38
39
40
41
42
43
44
45
46
47
48
49
50
51
52
53
54
55
56
57
58
59
60
61
62
63
64
65
66
67
@Override public void addMonitors (String area, String cacheName, Cache cache) { addMetricsMonitor(area, cacheName, cache); addCacheUpdateMonitor(area, cacheName, cache); } protected void addMetricsMonitor (String area, String cacheName, Cache cache) { if (defaultMetricsManager != null ) { cache = CacheUtil.getAbstractCache(cache); if (cache instanceof MultiLevelCache) { MultiLevelCache mc = (MultiLevelCache) cache; if (mc.caches().length == 2 ) { Cache local = mc.caches()[0 ]; Cache remote = mc.caches()[1 ]; DefaultCacheMonitor localMonitor = new DefaultCacheMonitor (cacheName + "_local" ); local.config().getMonitors().add(localMonitor); DefaultCacheMonitor remoteMonitor = new DefaultCacheMonitor (cacheName + "_remote" ); remote.config().getMonitors().add(remoteMonitor); defaultMetricsManager.add(localMonitor, remoteMonitor); } } DefaultCacheMonitor monitor = new DefaultCacheMonitor (cacheName); cache.config().getMonitors().add(monitor); defaultMetricsManager.add(monitor); } } protected void addCacheUpdateMonitor (String area, String cacheName, Cache cache) { if (cacheMessagePublisher != null ) { CacheMonitor monitor = event -> { if (event instanceof CachePutEvent) { CacheMessage m = new CacheMessage (); CachePutEvent e = (CachePutEvent) event; m.setType(CacheMessage.TYPE_PUT); m.setKeys(new Object []{e.getKey()}); cacheMessagePublisher.publish(area, cacheName, m); } else if (event instanceof CacheRemoveEvent) { CacheMessage m = new CacheMessage (); CacheRemoveEvent e = (CacheRemoveEvent) event; m.setType(CacheMessage.TYPE_REMOVE); m.setKeys(new Object []{e.getKey()}); cacheMessagePublisher.publish(area, cacheName, m); } else if (event instanceof CachePutAllEvent) { CacheMessage m = new CacheMessage (); CachePutAllEvent e = (CachePutAllEvent) event; m.setType(CacheMessage.TYPE_PUT_ALL); if (e.getMap() != null ) { m.setKeys(e.getMap().keySet().toArray()); } cacheMessagePublisher.publish(area, cacheName, m); } else if (event instanceof CacheRemoveAllEvent) { CacheMessage m = new CacheMessage (); CacheRemoveAllEvent e = (CacheRemoveAllEvent) event; m.setType(CacheMessage.TYPE_REMOVE_ALL); if (e.getKeys() != null ) { m.setKeys(e.getKeys().toArray()); } cacheMessagePublisher.publish(area, cacheName, m); } }; cache.config().getMonitors().add(monitor); } }
DefaultMetricsManager
默认的指标监控器
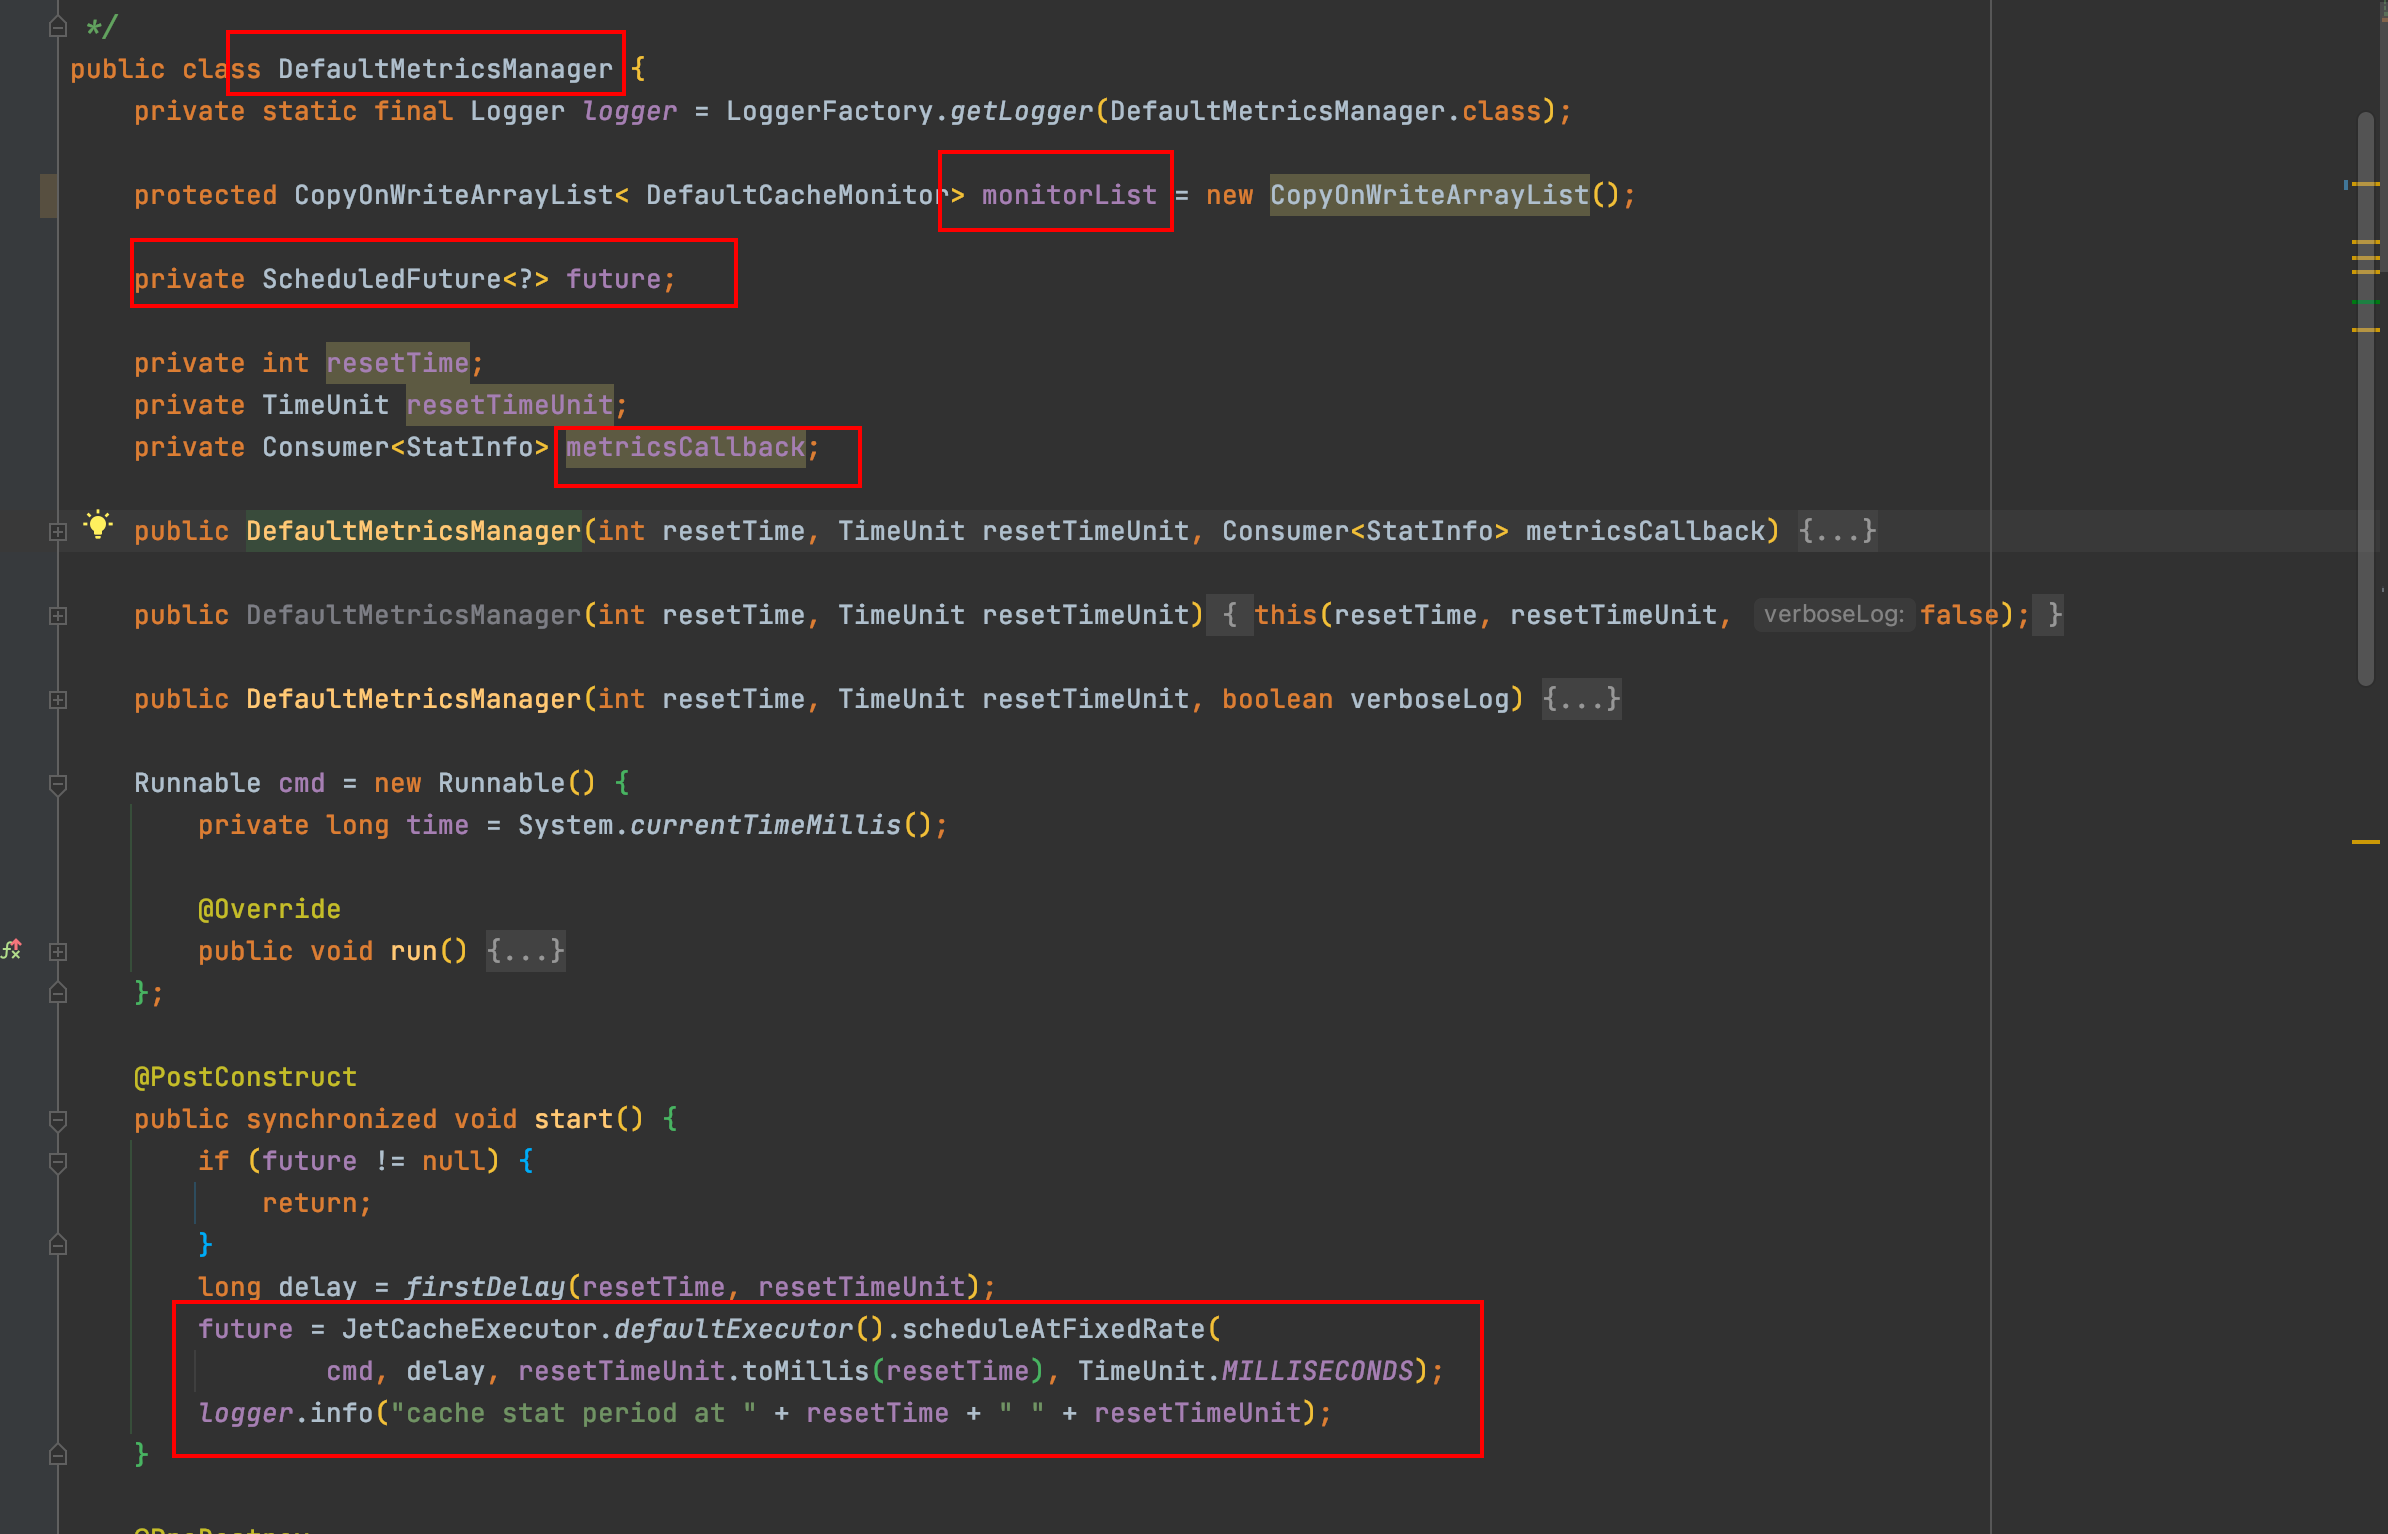
内部有个CopyOnWriteArrayList来保存需要监控的DefaultCacheMonitor, 有个ScheduledFuture用来定时扫描DefaultCacheMonitor, 可以通过参数resetTime和resetTimeUnit调整ScheduledFuture的执行间隔. 并且有个Consumer,用来定义如何处理每个缓存中的CacheStat信息, 默认的处理方式是StatInfoLogger,即日志打印出来. jetCache可以定时打印日志, 公布缓存使用情况.
1
2
3
4
5
6
7
8
9
10
11
12
13
14
15
16
17
18
19
20
21
22
23
24
25
26
27
28
29
30
31
32
33
34
35
36
37
38
39
40
41
42
43
44
45
46
47
48
49
50
51
public class DefaultMetricsManager { private static final Logger logger = LoggerFactory.getLogger(DefaultMetricsManager.class); protected CopyOnWriteArrayList< DefaultCacheMonitor> monitorList = new CopyOnWriteArrayList (); private ScheduledFuture<?> future; private int resetTime; private TimeUnit resetTimeUnit; private Consumer<StatInfo> metricsCallback; Runnable cmd = new Runnable () { private long time = System.currentTimeMillis(); @Override public void run () { try { List<CacheStat> stats = monitorList.stream().map((m) -> { CacheStat stat = m.getCacheStat(); m.resetStat(); return stat; }).collect(Collectors.toList()); long endTime = System.currentTimeMillis(); StatInfo statInfo = new StatInfo (); statInfo.setStartTime(time); statInfo.setEndTime(endTime); statInfo.setStats(stats); time = endTime; metricsCallback.accept(statInfo); } catch (Exception e) { logger.error("jetcache DefaultMetricsManager error" , e); } } }; @PostConstruct public synchronized void start () { if (future != null ) { return ; } long delay = firstDelay(resetTime, resetTimeUnit); future = JetCacheExecutor.defaultExecutor().scheduleAtFixedRate( cmd, delay, resetTimeUnit.toMillis(resetTime), TimeUnit.MILLISECONDS); logger.info("cache stat period at " + resetTime + " " + resetTimeUnit); } }
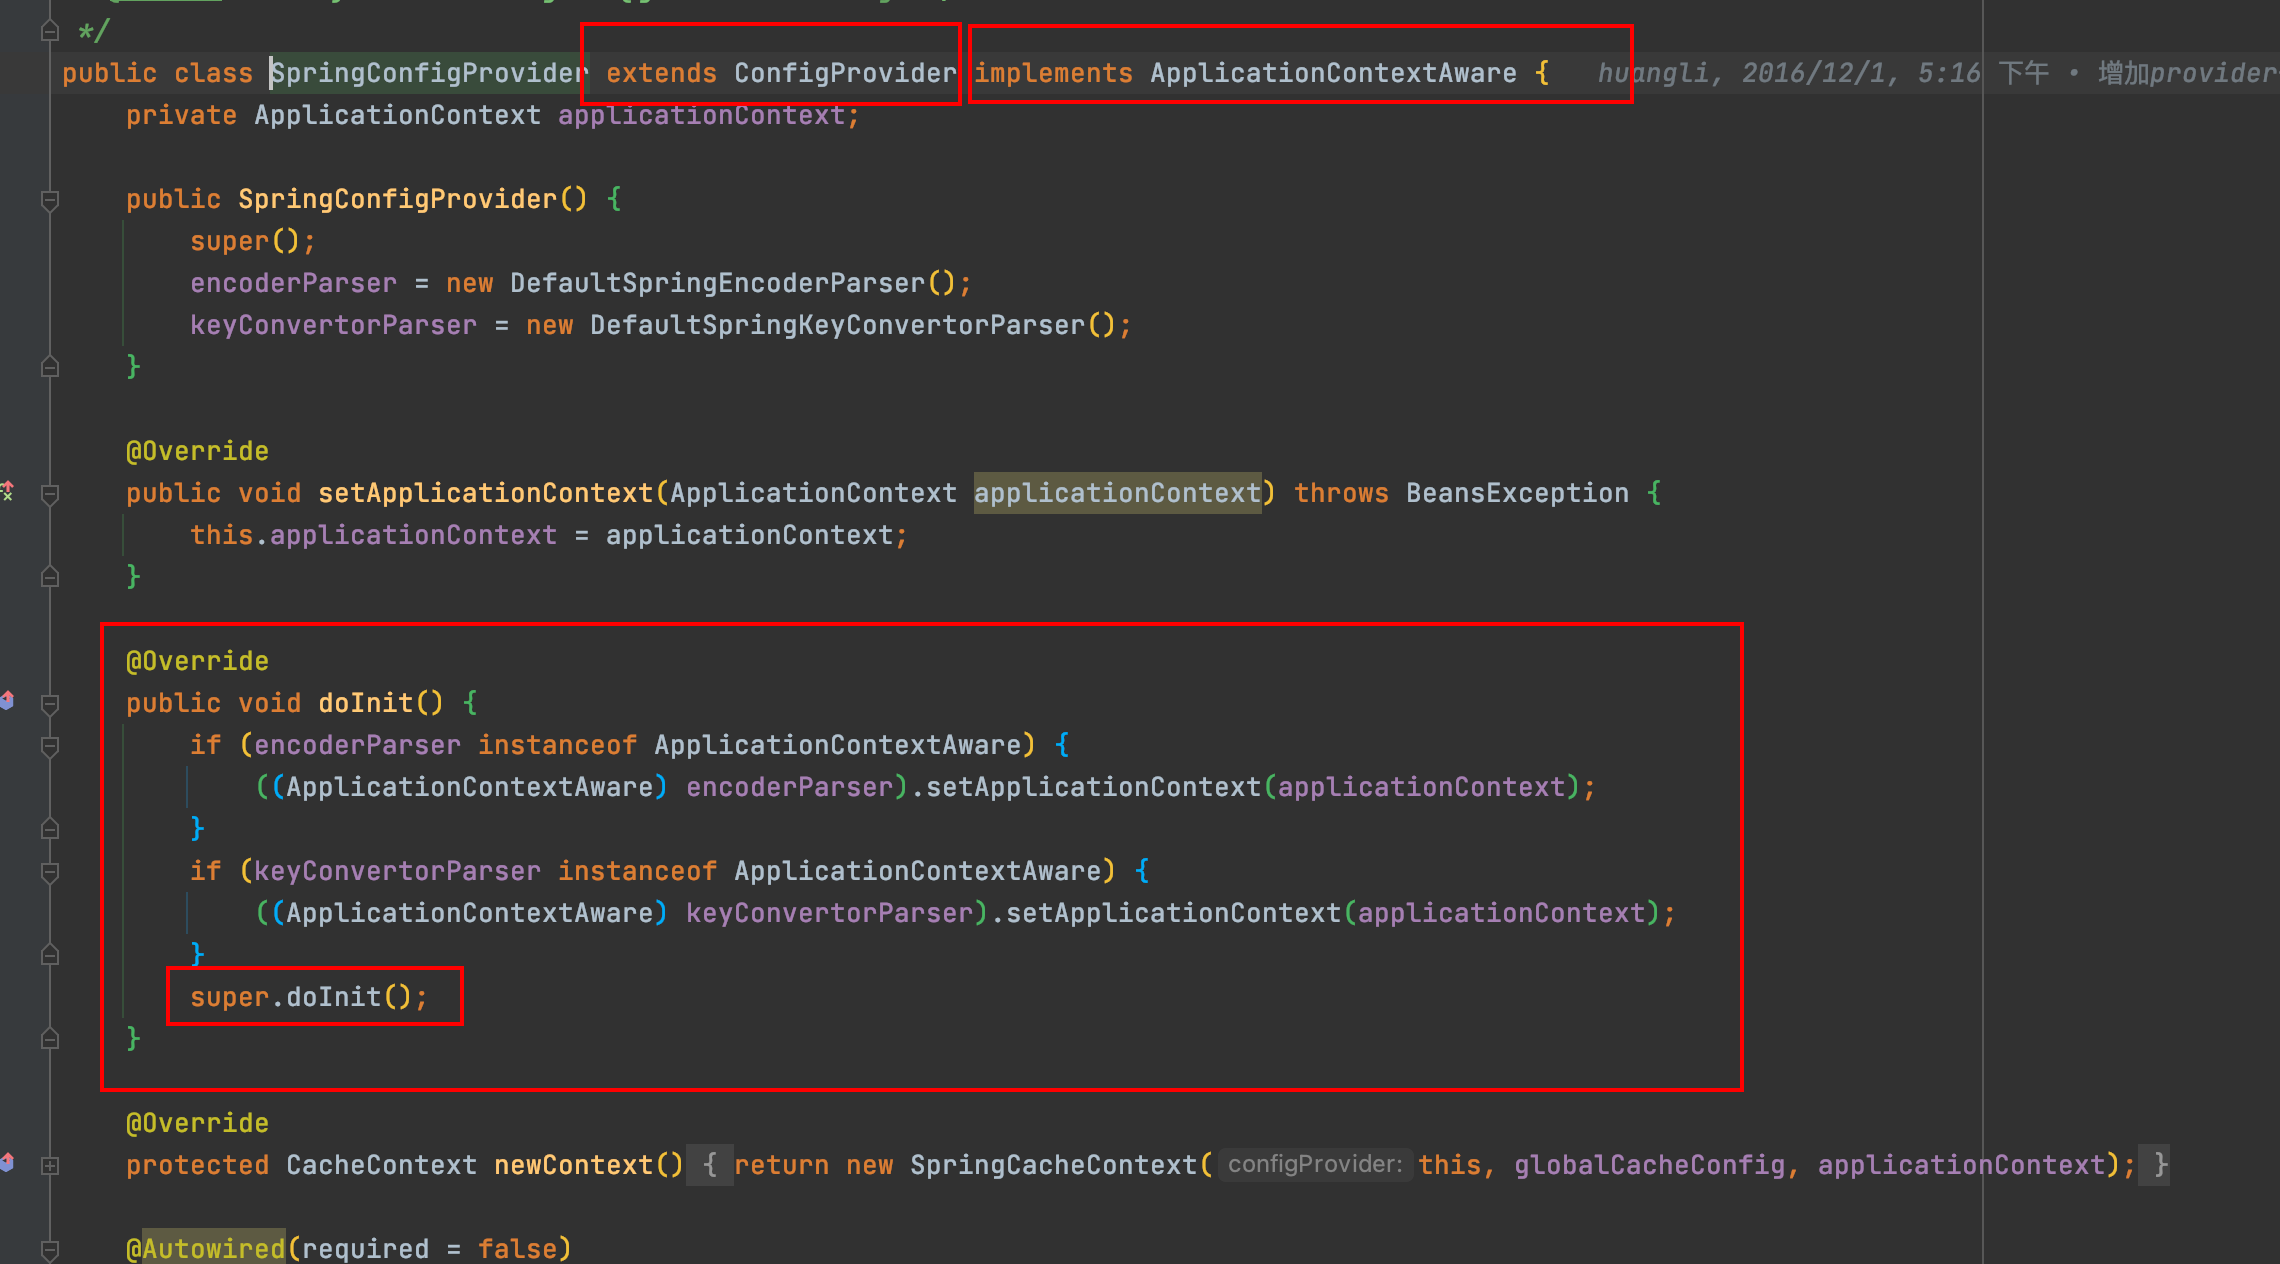
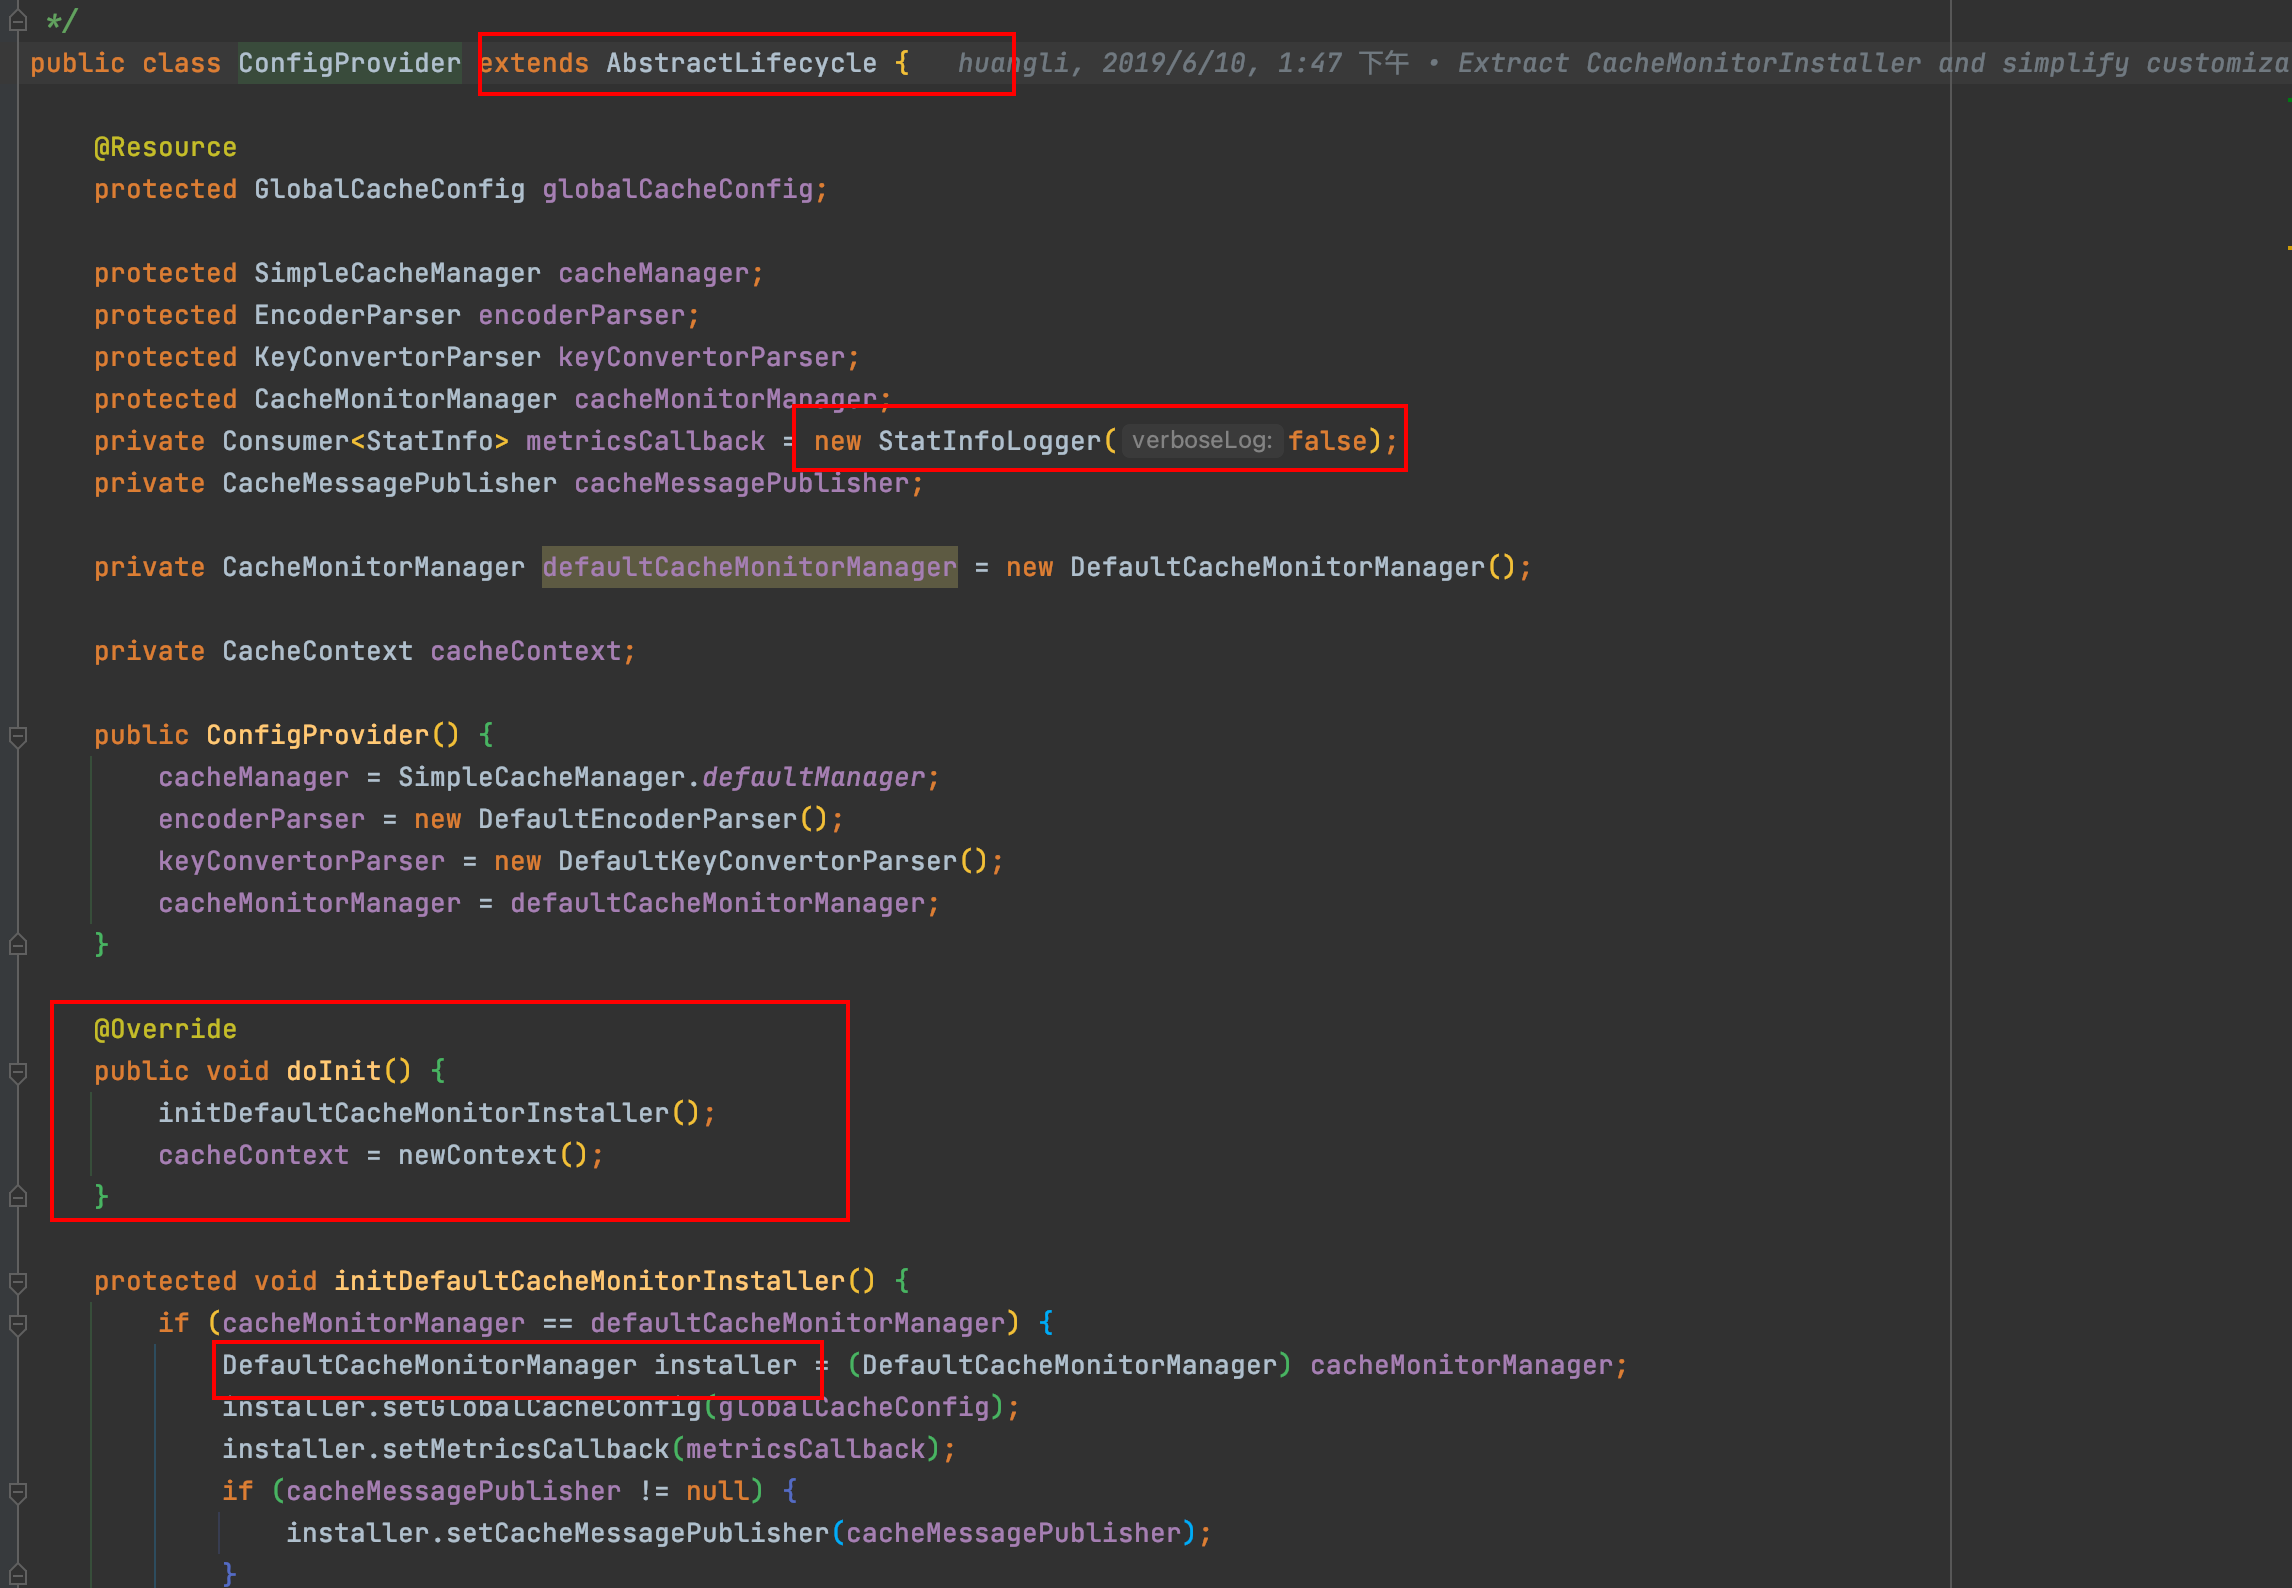
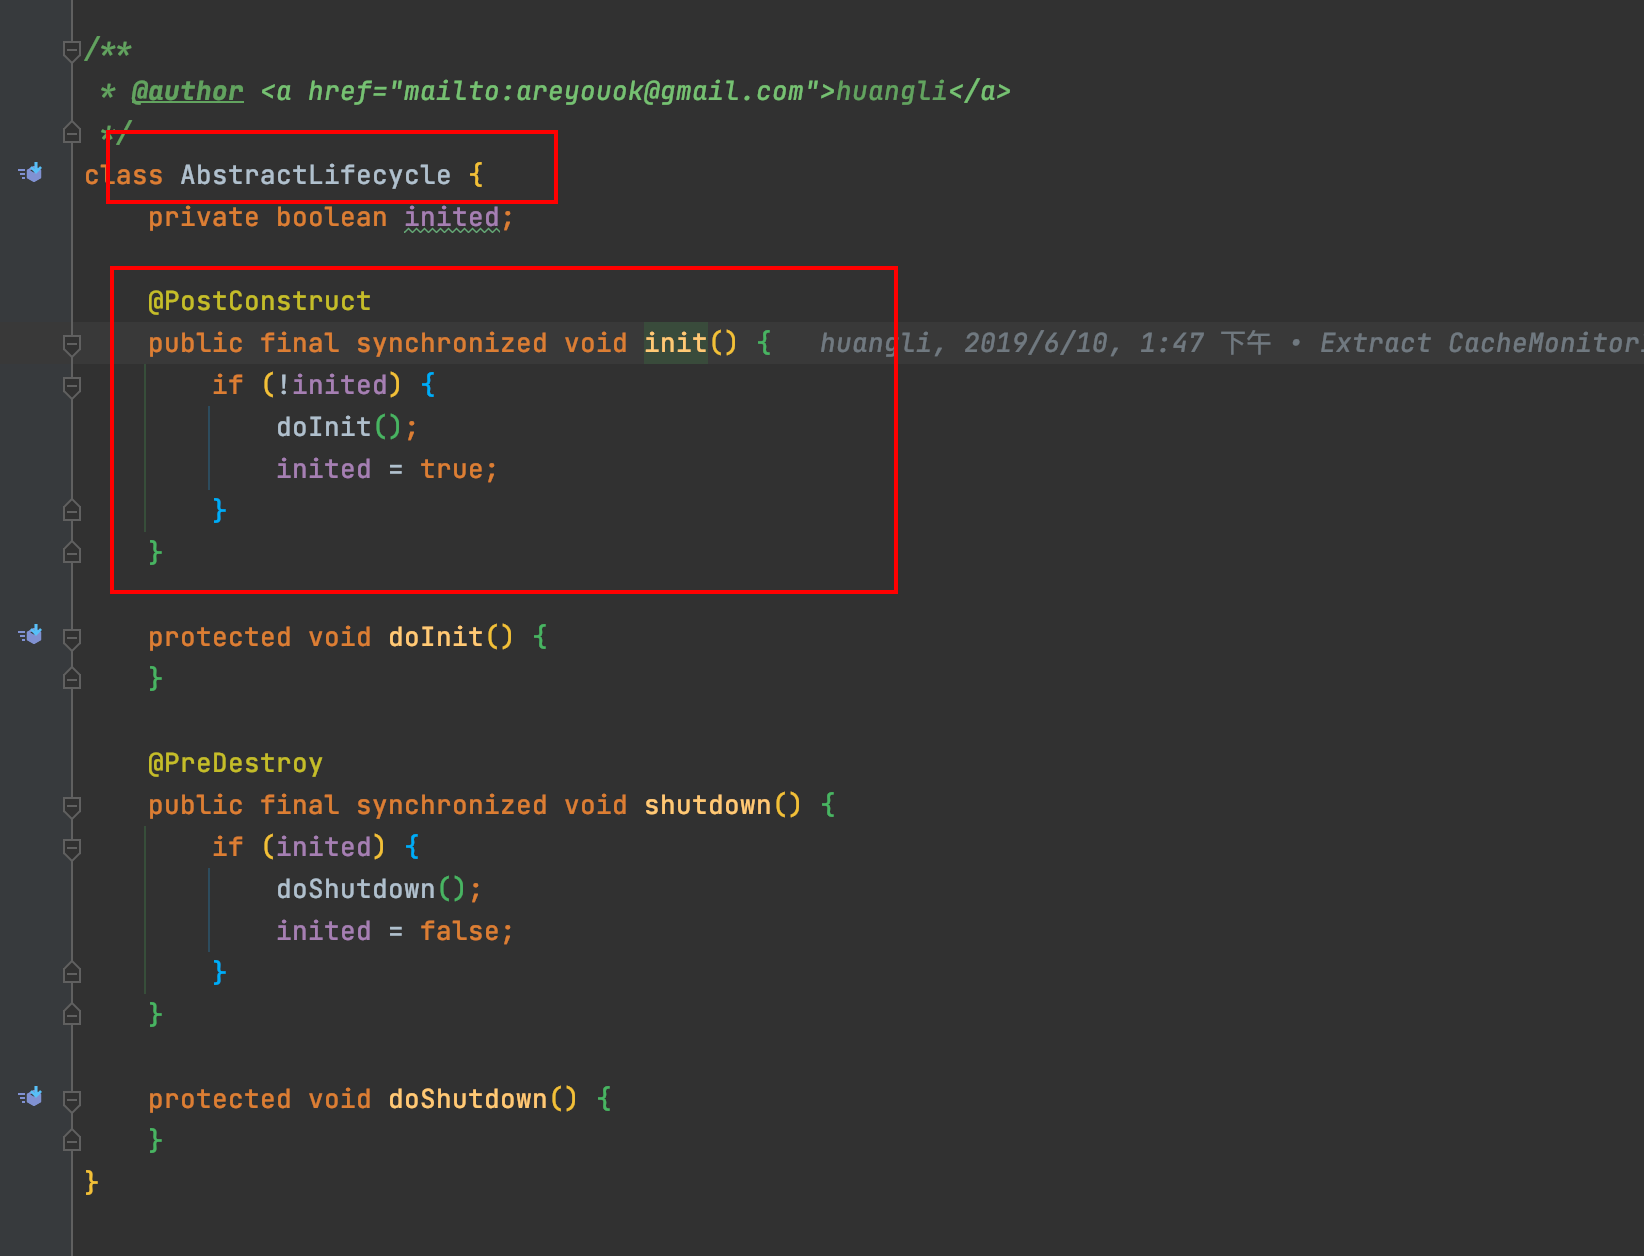
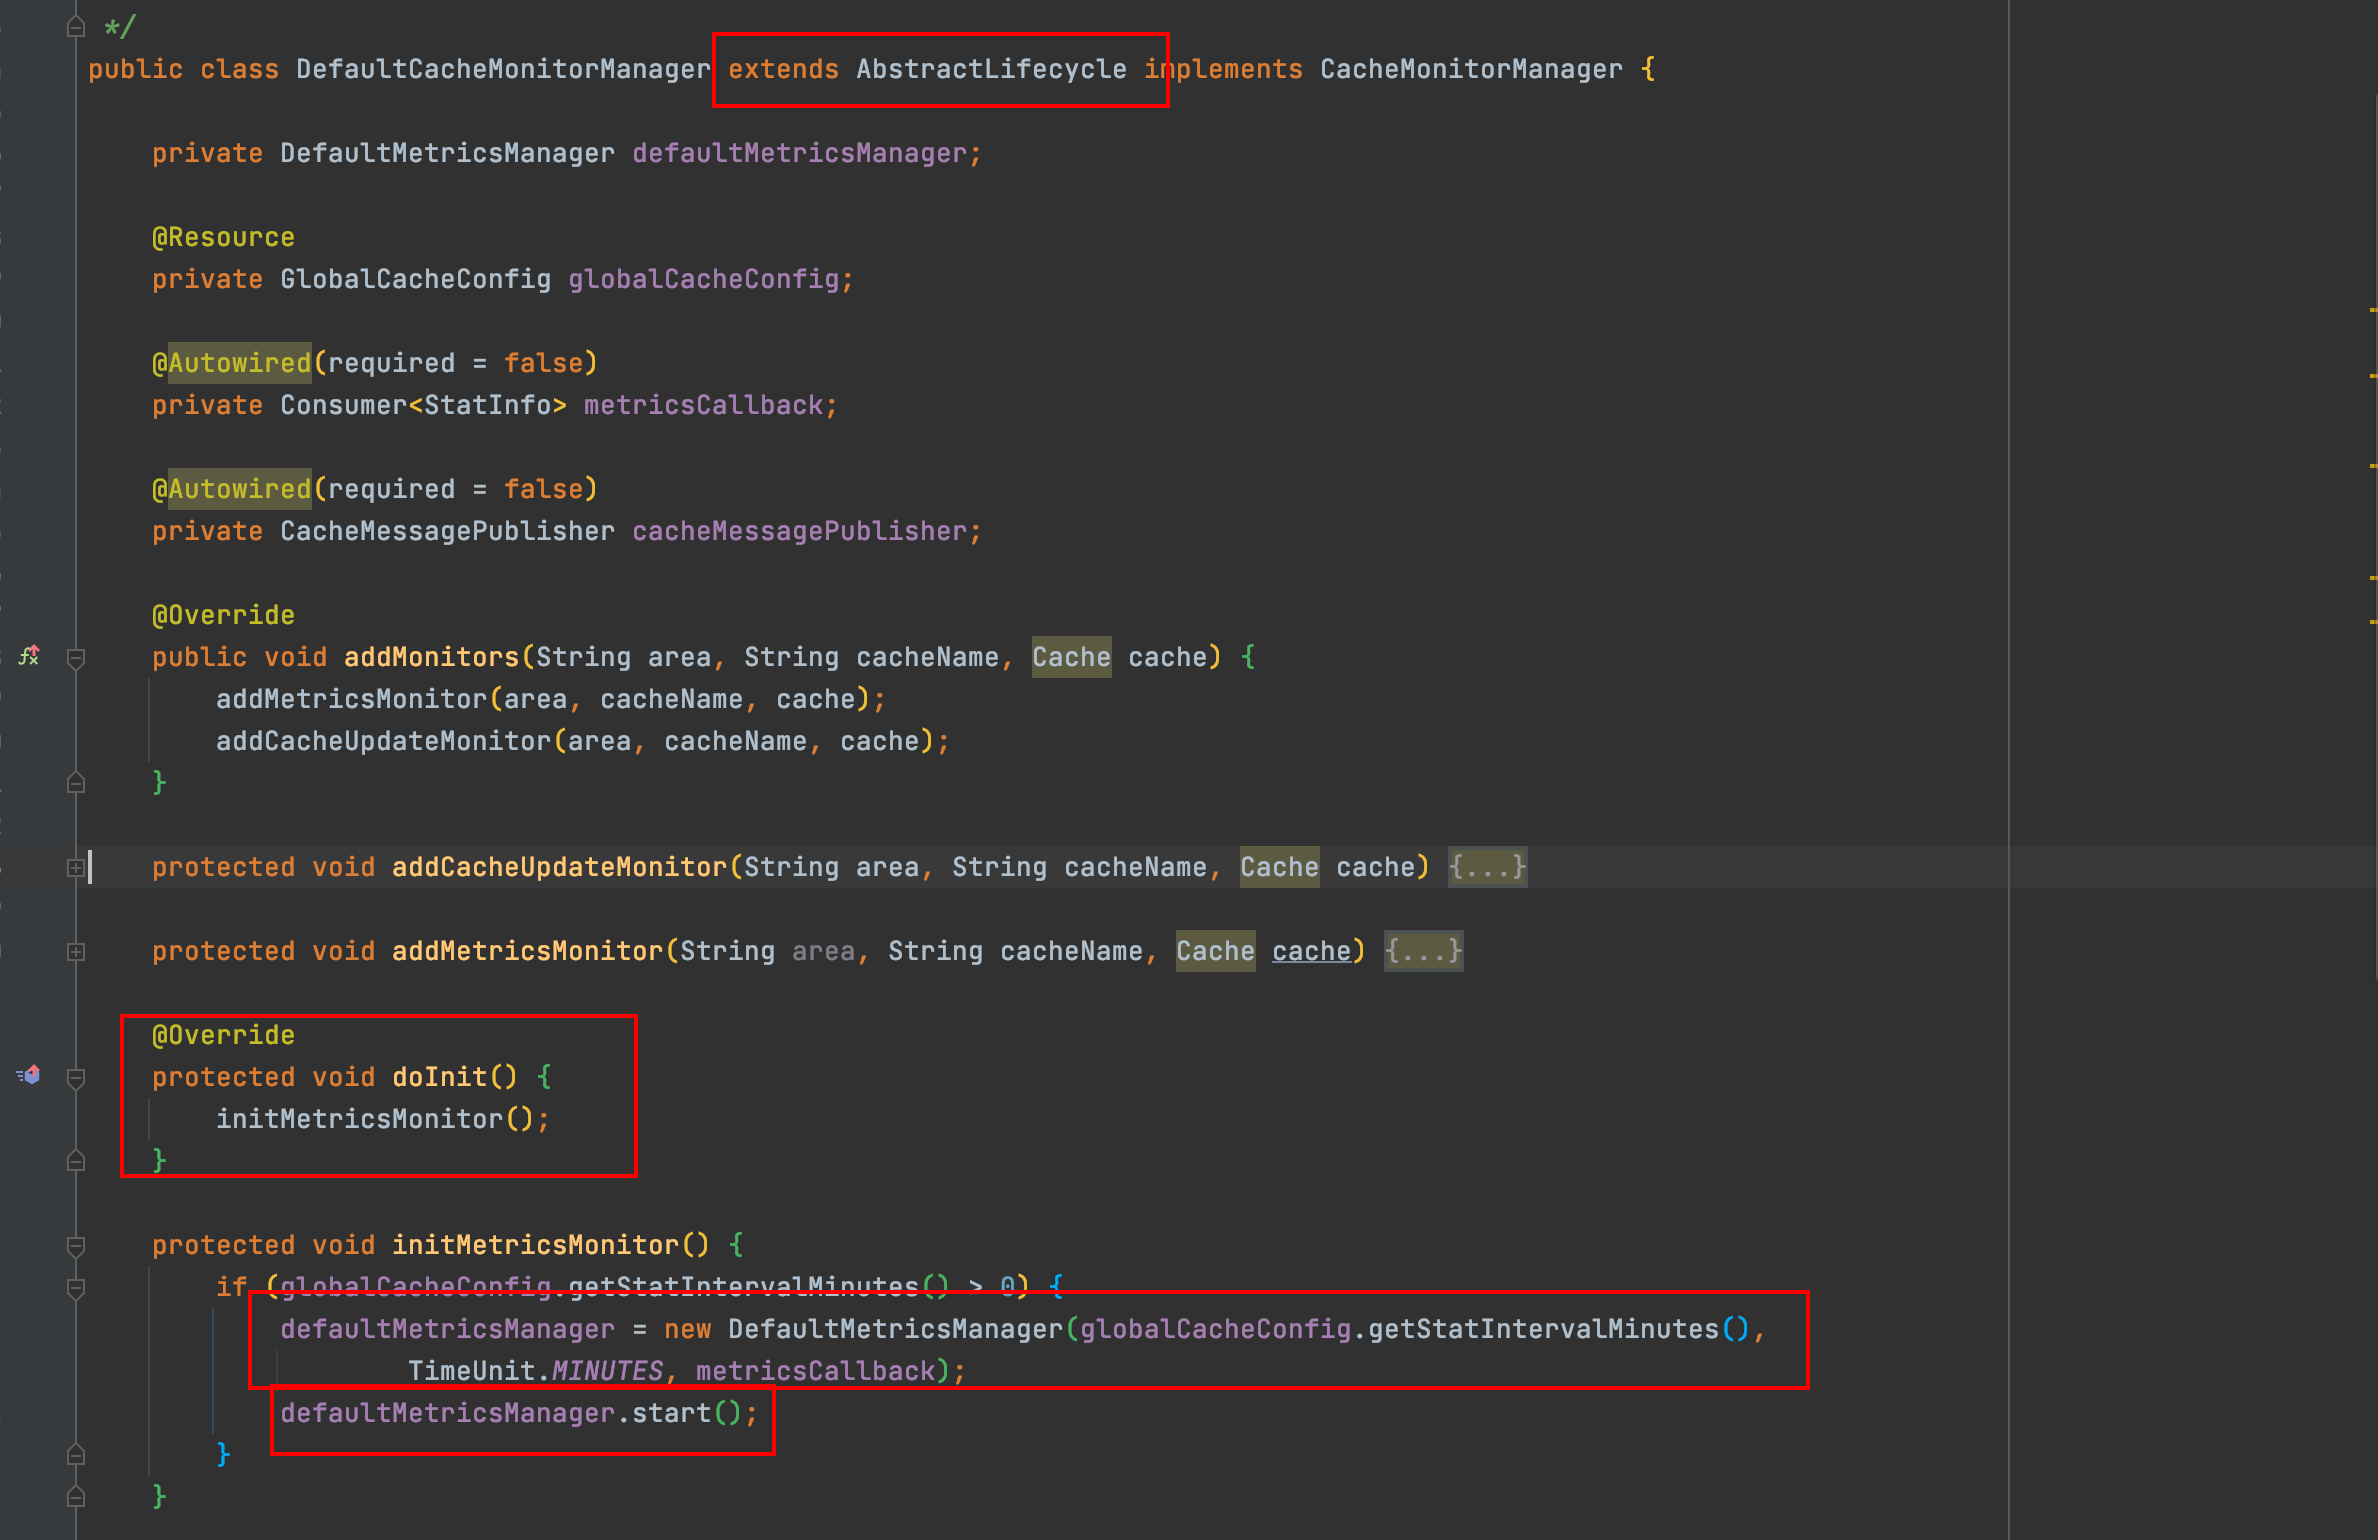
与Spring的对接 jetcache继承了AbstractLifecycle并实现了Spring的ApplicationContextAware, 启动时将会自动执行onInit()方法, onInit()方法将会执行initDefaultCacheMonitorInstaller传入默认的metricsCallback(就是个StatInfoLogger), 并执行init方法, DefaultCacheMonitorManager中的DefaultMetricsManager将会被start(), start()内会启动一个周期性定时线程池来扫描DefaultCacheMonitor中的CacheStat, 最后转化成StatInfo, 交给metricsCallback去处理.
上图: